Tuesday, November 25, 2014

THANKFUL FOR YOU WORD ART

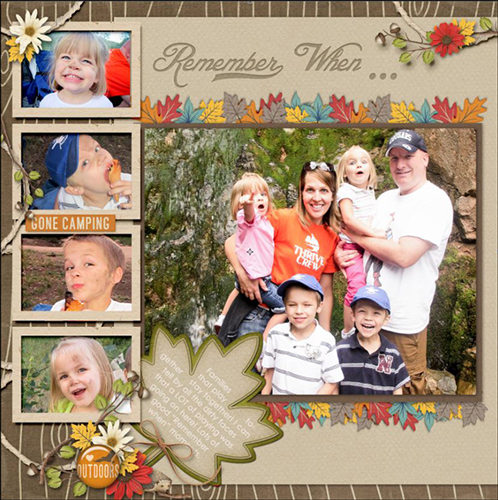
Thankful For You Word Art

Gobble Up the Freebie
by Jen White

What are you thankful for? We are thankful for the entire digital scrapbooking community, and here is one small token of our appreciation: a freebie for you!!

gobble-freebie-img2

The button to download this FREE piece of word art is below. But first, let me give you a couple useful tips for adding this word art to your scrapbook page.

gobble-freebie-img1

Change the Color

The word art looks GREAT in black, but try other colors that match your papers, elements, or photos. Here’s how:

1. Click on the Foreground Color Chip. In the Color Picker, choose a color and click OK.
2. In the Layers panel, activate the word art layer.
3. Press Alt Shift Backspace (Mac: Opt Shift Delete) to fill the word art with the new color.

gobble-freebie-img3

Change the Blend Mode

Blend Modes are your friend! Whenever adding word art to your scrapbook page, always run through the Blend Modes to see if something SUPER COOL evolves. You just never know until you’ve tried! Here’s how:

1. Add the word art to your scrapbook page. Your page needs to have a background paper already.
2. In the Layers panel, choose a different Blend Mode.
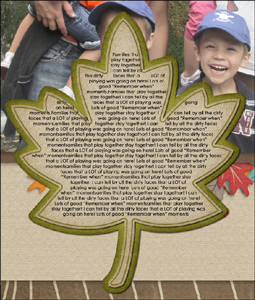
In the image above:
• The first image is black word art with a Normal Blend Mode.
• The second image is black word art with a Soft Light Blend Mode.
• The third image is white word art with an Overlay Blend Mode.

Windows Quick Blend Mode Scrolling Tip:
In the Layers panel, click on the drop-down menu for the Blend Modes, then close it. Press the Up and Down Arrow keys to cycle through the Blend Modes.

Mac Quick Blend Mode Scrolling Top:
Get the Move tool. Holding down the Shift key, press the – (Minus) and + (Plus) keys.

What font is it? Enquiring minds will want to know what fonts I used for this piece of word art. No problem! But before I tell you, you should know that I applied a couple filters and a grungy texture to the fonts.
Fonts used: Great Vibes Regular, News Gothic MT Regular

Click HERE to download the word art.

Interested in learning more about blending and digital scrapbooking? Check out these two fantastic classes:

The Art of Blending Class

Blend like a PRO

Learn FAST w/o Frustration

Learn FAST w/o Frustration

_____________________________________________

jenwhite-48x48Author: Jen White | jen@digitalscrapper.com
All comments are moderated. 
Please allow time for your comment to appear.


Photo Christmas Ornament

Christmas Ornament
Linda Sattgast

By Linda Sattgast

At our house, decorating the Christmas tree is a festive family tradition. Shiny or decorated bulbs constitute a significant percentage of our Christmas ornaments, so I thought I would share a tutorial on how to create a digital bulb using a favorite photo.

Make a Selection On your Photo

  • Open the photo you want to turn into a Christmas ornament. (File > Open) The best kind of photo is one that has some space around the main subject.
  • Get the Elliptical Marquee tool. In Tool Options, click on the New Selection icon. Feather should be zero and Aspect Normal. (Photoshop: Style should be Normal.)
  • Click in the center of your subject’s face (or whichever area you want the least amount of distortion. Then add Alt Shift (Mac: Opt Shift) and drag outward to create a selection outline. Don’t allow the selection to go outside the bounds of your document. When you’re satisfied, let go of the mouse, and then let go of the keyboard keys.
  • Press Ctrl J (Mac: Cmd J) to copy the selection to a new layer.
  • In the Layers panel, click on the Visibility icon of the Background layer to hide it.

Distort with the Spherize Filter

  • Ctrl click (Mac: Cmd click) on the thumbnail of the new layer to bring back the selection outline.
  • In the Menu Bar, choose Filter > Distort > Spherize.
  • When the dialog box comes up, adjust the percentage of the preview image until you can see the entire ornament in the Preview window.
  • Adjust the Amount slider. Most of the time you’ll need 100%. The Mode should be Normal. Click OK. Your photo will appear slightly rounded.
  • If you want a rounder effect, you can run the filter again.

Optional: Add a Reflection

  • In the Menu Bar, choose Filter > Render > Lens Flare.
  • When the Lens Flare dialog box comes up, choose “105mm Prime” and click on your photo preview where you want the cross-hair, or the brightest center of the flare, to be. Adjust the slider to the brightness you want and click okay.
  • Press Ctrl D (Mac: Cmd D) to deselect.

Add the Ornament Hanger

An ornament hanger is the finishing touch you need to make your Christmas ornament look authentic. 
Click here to download the ornament hanger

  • Open the ornament hanger, and with the Move tool, click and drag it onto your photo.
  • Move the Christmas ornament and hanger until they are lined up.
  • If you need to resize either the photo or the hanger, press Ctrl T (Mac: Cmd T) to get Transform options. Click and drag from a corner handle to resize. (Photoshop: press Shift as you click and drag from a corner handle.) When you’re satisfied, double click inside the outline to commit the change.
All-Season Snow Globe

Learn More

If you enjoyed this tutorial, you’ll love our All Season Snow Globe mini class! It contains a glass globe template that you can use on your Christmas ornaments to make them even more shiny.

Find out more about the Snow Globe class.


Tuesday, November 18, 2014

THE 15 FEATURES OF YOUR DSLR THAT EVERY PHOTOGRAPHER SHOULD KNOW


7 Fun Photography Tricks to Try on Your Smartphone

http://youtu.be/fTz4Nhgm_SQ

Where Four Corners Meet

Where Four Corners Meet

Where Four Corners Meet
by Jenifer Juris

I come from a small town in the middle of North Dakota. At our school, we had a teacher who had been teaching the same classes year after year for over 40 years. In fact, both my father and I had her for Jr. High English, and he found it very funny that all those years later, her lessons remained nearly unchanged.

I sometimes fall into this rut with scrapbook layouts. Twenty pages later and I’m recycling the same ideas all over again. (Not to say that this is all bad as I have a scrapbook style I lean toward, and that’s okay.) But sometimes, I want to make something new without having to work too hard. That’s where my tutorial comes in. Today I’m going to show you how to jump start a simple page design and take it your own direction.

Step One: Prepare the Workspace

  • Create a new 12 x 12 inch document (File > New > Blank File) at 300 ppi with a white background. (Photoshop: Choose File > New.)
  • In the Menu Bar, choose View > Rulers.
  • Press the letter D to reset the color chips to the default of black and white.

Step Two: Draw the First Line

  • In the Layers panel, click on the Create a New Layer icon.
  • Get the Line tool. It is nested with the Shape tools.
  • In the Tool Options, set the Width to 5 px, set the Style to None, and set the Arrow Head to No Arrow Head. (Photoshop: Also, set the Tool Mode to Shape. Open the Geometry Options and uncheck Start and End.)
  • On the document, while holding down the Shift key, click and drag to create a line down the middle of the page, leaving roughly 1.5 inches of space at each end of the line. Press and hold the Space bar to reposition the line while dragging.

dst-four-corners-img-01

Step Three: Duplicate the Line

  • Press Ctrl J (Mac: Cmd J) to duplicate the line.
  • Press Ctrl T (Mac: Cmd T) to get the Transform options.
  • In the Tool Options, set the Angle to 90˚. Click the checkmark to commit the changes. (Photoshop: Set the Rotation to 90˚.)

dst-four-corners-img-02

Step Four: Center the Lines

  • In the Layers panel, while holding down the Shift key, click on the Background layer to activate all three layers.
  • Get the Move tool.
  • In the Tool Options, click the Align Vertical Centers icon and the Align Horizontal Centers icon.

Step Five: Add Finishing Touches

  • Add shapes, text, and other finishing touches to bring this page design together.
  • Complete the rest of the scrapbook page as you normally would.

Pictured below are just three of the many ways you could choose to finish off this page design.

Option One:

dst-four-corners-img-03

Option Two:

dst-four-corners-img-04

Option Three:

dst-four-corners-img-05

I can’t wait to see the many ways you will use this page design, and I hope this quick and simple idea will help you jump start your next layout! I would also love to see what you create using this idea, so please post your layouts in the Digi Scrap Tutorial Gallery.

Here’s the finished layout I made using one of the ideas above. I really like how this page came together, and I hope you will find this page design idea as inspiring as I did!

dst-Four-Corners-Scrapbook-Page

Credits:
Where Four Corners Meet Tutorial by Jenifer Juris
Software: Photoshop Elements 12, Adobe Photoshop CC 2014
Taking Time to Relax by Eva Kipler
Fonts: Century Gothic, KG One Thing

If you liked this tutorial, you might also like:

Learn FAST w/o Frustration

Learn FAST w/o Frustration

Learn Page Design

Page Design Video Tutorial by Barb Brookbank

Daily Life Template Video Tutorial

Daily Life Template Video Tutorial

PDF Download

_____________________________________________

Jenifer JurisAuthor: Jenifer Juris | jenifer@digitalscrapper.com
All comments are moderated. 
Please allow time for your comment to appear.


Text Out of the Box

Text Out of the Box

Text Out of the Box
by Nannette Dalton

Words are important. We use words to communicate with our friends and family; we use words to conduct business. Words are a huge part of every aspect of our lives. It’s hard to imagine a world without words.

Words are also important on our scrapbook pages. They help us tell the story; they record important dates and events; they let us share our thoughts and emotions. Sometimes we need a little more than that square shaped text box to express the important words we are trying to share.

Today we are going to take that text right out of the box and put it into a custom shape that you can use to fill a journaling spot or as its own element on a page.

In the October 2014 Tidbit, I taught you how to make this leaf journaling mat. Today I will show you how to journal inside the leaf shape.

dst-Text-out-of-box-09jpg

Step One: Open a Scrapbook Page

  • Open the layered scrapbook page (File > Open) with which you would like to work.
  • In the Layers panel, activate the top layer.

Step Two: Create a Leaf Shape

  • Get the Custom Shape tool.
  • In the Tool Options, set the Style to None and click on the Create New Shape Layer icon. (Photoshop: Set the Tool Mode to Shape and the Path Operations to New Layer.) Set the Color to 50% Gray. Open the Geometry Options and choose Unconstrained. Open the Custom Shape Picker and choose Leaf 5. If you do not see the Leaf 5 shape, open the fly-out menu and choose Large List. Open the drop-down menu and choose All Elements Shapes. (Photoshop: Open the fly-out menu, choose All, and click OK.)
  • On the scrapbook page, while holding down the Shift key, click and drag to create a proportional leaf shape.

Note: This will work with all shapes. I am using the Leaf 5 shape if you want to follow along. I made my shape the same size as my original leaf mat.

dst-Text-out-of-box-01

Step Three: Add Some Journaling

  • Press the letter D to reset the Color Chips to the default of black and white.
  • Get the Horizontal Type tool.
  • In the Tool Options, choose a Font and set the Size as desired. I am using Century Gothic Regular at 14 pt. Set the Leading to Auto. Click on the Center Text icon (PSE 10: Also set the Style to None.)
  • On the scrapbook page, hover your mouse over the leaf shape. A dotted circle will appear around the Type icon. Click anywhere inside the leaf shape and begin typing. Click the checkmark to commit the type.

dst-Text-out-of-box-02

  • Press Ctrl T (Mac: Cmd T) to get the Transform options.
  • On the scrapbook page, while holding down the Alt key (Mac: Opt key), click on a corner handle of the Bounding Box and drag inward to bring the text away from the edge of the leaf shape. (Photoshop: Hold down Shift Alt (Mac: Shift Opt) while dragging.) Click on the checkmark to commit the transformation.
  • In the Layers panel, click on the leaf shape layer and drag it to the Trash icon.

My journaling stays within the bounds of the leaf. If I were to journal a little more and change my font to a smaller size, it would take on more of the leaf shape.

dst-Text-out-of-box-03 dst-Text-out-of-box-04

Here is a little extra tip: Sometimes the journaling looks better with fully justified text. Here are the instructions to do that.

Step Four: Fully Justify the Text (Optional)

  • In the Layers panel, double click on the thumbnail of the Type layer to highlight the text.
  • Press Ctrl Shift J (Mac: Cmd Shift J) to justify the type within the shape.
  • Click on the checkmark to commit the change.

Here are some great examples from Creative Team member Kathy. She has filled a shape with journaling then used that as an element on her page.

Kathy’s pages are linked for credits.

dst-Text-out-of-box-06jpg dst-Text-out-of-box-07

Here is my finished layout using “text out of the box.” I’m excited to see how you might use this technique in your scrapbooking. Post your layouts in the Digi Scrap Tutorial Gallery so we all can see.

dst-Text-out-of-box-05

Credits:
Digi Scrap Tutorial: Text Out of the Box by Nannette Dalton
Scrapbook Page: Remember When by Nannette Dalton
Photos by Misty Marsh
Software: Photoshop Elements 12, Adobe Photoshop CC 2014
Custom Shape Journal Mats Tidbit by Nannette Dalton
Kit: Nature’s Playground by Kim Broedelet
Fonts: Blessed Day, Century Gothic

Download this Digi Scrap Tutorial

_____________________________________________

Nannette-DaltonAuthor: Nannette Dalton | nann@digitalscrapper.com
All comments are moderated. 
Please allow time for your comment to appear.

11


Sent from my iPhone