If you have kids like mine, you are up way before the sun even thinks about waking up. Sure, you may be tired. And the dark makes you want to crawl back into bed.
But use this early morning opportunity to try something new. Grab your camera, your coat, and head out to watch the sun rise!
Here are a few things to keep in mind:
1. Plan ahead. You can check the time for your local sunrise by visiting the Sunrise/Sunset calculator. Make sure you’re ready to capture the sunrise at least 20 minutes beforehand, so you can get set up. Weather can affect your picture so make sure you check the weather report.
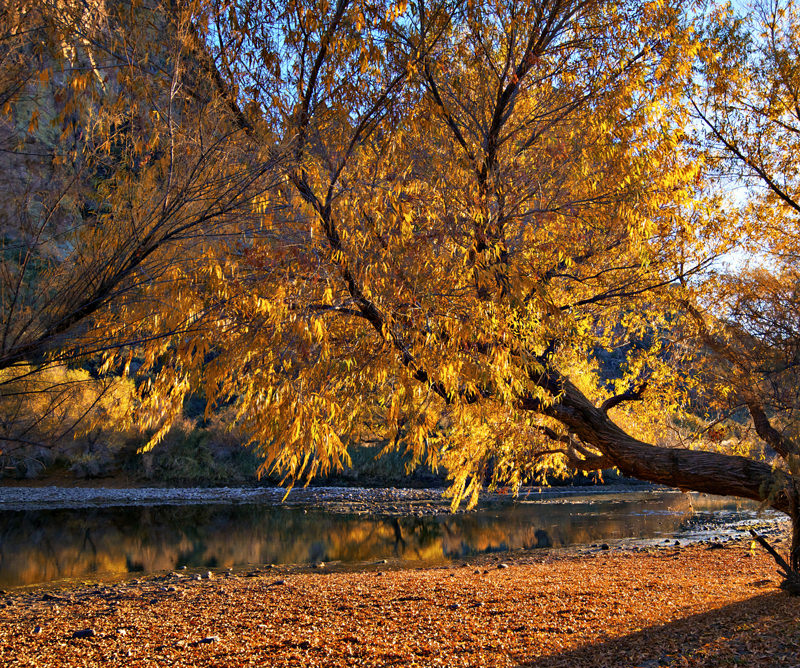
2. Look around. You don’t always have to shoot the sunrise directly. There is some amazing lighting during a sunrise. Look around and see how the light reflects off of a building or, if you’re lucky, the ocean. If you are shooting in a more natural setting, look in the trees and see how the leaves filter the light.
3. Grab a tripod or set your camera on a ledge. The important thing here is that you want the camera to stay still.
4. Use the right settings. If your camera has the capability, be sure you are not shooting in Auto White Balance. You may miss a lot of the colors that are in a sunrise. Instead, try shooting with a “Cloudy” white balance. This is the white balance setting that I use 95% of the time when shooting outdoors. This way, you will capture more warm tones and really capture a good representation of the sunrise colors.
Hint for Smartphone Users: Often, your best camera is the one you have on you, and for many of us, that is the camera we have on our smartphones. While these cameras don’t typically have white balance capability, you can still take great photos. I use either the HDR setting or I underexpose slightly by tapping my finger on the screen and pulling down the slider that appears next to the box. Then, after I’ve taken the photo, I go into the “Edit” function and do a little post editing. Usually all I need to do is decrease my highlights and brighten my shadows a bit. I find a little contrast and color boost (saturation) helps bring out what I’m seeing with my natural eye.
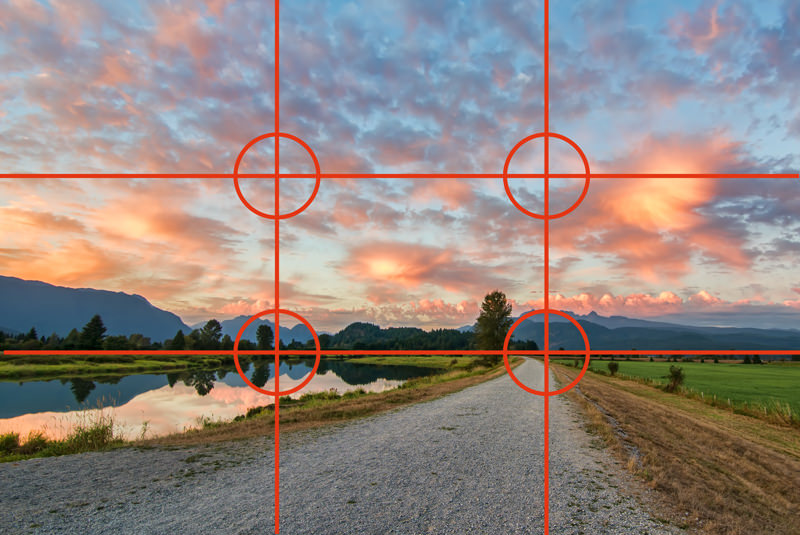
5. Pay Attention to the Rule of Thirds. Keep your photos interesting! While not a hard and fast rule, a photo will typically be more pleasing if you frame it according to the rule of thirds. In your mind’s eye, draw an imaginary tic tac toe board on top of the image your are framing. Where possible, place your horizon near either the upper or the lower horizontal line and place your focal point (in this case the end of the visible road) near one of the four circles where the lines intersect as shown:
Of course, rules are meant to be broken! And sometimes it makes sense to put your focal point right in the center of your photo. So play around and see what you like best.
6. Keep Shooting. This is always one of my tips. Shoot, shoot, shoot, shoot. Change up your angles and play around with your composition. The sun and lighting is always changing during a sunrise so make sure you capture it all. When you go back through your pictures when you get home, you will have a ton of options to choose from.
7. Enjoy Yourself! When I consciously make the effort to take a sunrise picture, I like to go alone. I grab a cup of coffee and head out. There’s something relaxing about the quiet and beauty that you experience when watching a sunrise.
Originally posted January 29, 2012 by Stephanie Glover. Revised March 1, 2016
15 of the Best Cheat Sheets, Printables and Infographics for Photographers
Everyone loves cheat sheets, and photographers are no exception. Squeezed into a set of short tips, schemes, and definitions, a cheat sheet is a quick way to learn something, as well as refresh your knowledge about any particular subject. Moreover, now that infographics are an extremely popular format of delivering information on the Internet, cheat sheets can also be a source for visual inspiration.
Here is a large collection of some noteworthy cheat sheets, infographics, and printables for photographers. From shooting basics to photography marketing tips, every aspect of photography is covered in this round-up. No matter whether you’re an amateur or an experienced professional, below you can find some really helpful resources, all presented as easy-to-read checklists, infographics, and printable cheat sheets for your advantage.
Enjoy this compilation and don’t forget to bookmark this page for quick access to this exhaustive cheat sheet list. Note, you need to click on screenshots below in order to view the full cheat sheet since most images were cropped for proper fit.
Photography Tech and Creative Process
Learn the basics every photographer must know and save some useful tips and camera settings for quick reference. Click the links to see the original article and source.
Perhaps you clicked on this headline eager for the answer that’s been plaguing you since you decided to get into photography—What camera should I buy? What’s the best DSLR camera for beginners?
And we could comb through all the options and shine a light on one particular model, then you’d go out and buy that camera and get started and, more than likely, do just fine. But there’s a problem with that. First, the best camera for a beginning portrait photographer isn’t the best camera for the beginning sports photographer. Cameras aren’t a one-size-fits-all deal.
But there’s another issue too—learning how to choose a camera is a great first step to learning about photography. Great cameras don’t take great pictures any more than a great paintbrush painted the Mona Lisa—you need creativity, and you also need to know how to use that camera. And the best way to learn how to use your camera? Start by learning how to choose a camera. Don’t worry, those tech specs aren’t as daunting as they seem. For a more detailed breakdown, be sure to check out the full free course on choosing your first DSLR camera.
Brand: Nikon Vs. Canon Vs. The Little Guy
Should you buy a Nikon or a Canon? Or perhaps a camera from a smaller brand, like Pentax? What features make a camera the best entry level DSLR?
Brand is a bit more important when buying a DSLR compared to a compact camera, because once you start acquiring lenses and accessories, it becomes rather expensive to switch. But that doesn’t mean one brand is better than the other. Nikon makes great DSLRs. Canon makes great DSLRs. Pentax makes great DSLRs. Sure, one year it seems like one brand is beating out the competition with every camera they release—but the next year, it will likely be the other way around.
Brand matters, but probably not in the way you think. Choose a camera based on its features, not its brand. Then, before you buy, explore the different lenses and accessories that are available. If you want to learn how to take wildlife pictures, for example, make sure the camera you choose has a compatible telephoto lens. That’s where Nikon and Canon are great, because they’re so popular and well-established, that there are plenty of lenses, flashes and other accessories to choose from. That doesn’t mean you should stay away from smaller brands though; Pentax also makes some great cameras with features like weather sealing that are tougher to find at a similar price point from the bigger manufacturers.
Sensor size and design for the best entry level DSLR
When you take a digital photograph, light enters through the lens, then hits the sensor—it’s that sensor that records the image. Sensors come in all different sizes. The sensor in your smartphone’s camera is very small, while a DSLR sensor is much larger. Larger sensors are better for a number of different reasons. First, images captured on a larger sensor have a higher resolution, because a larger sensor equals a larger photo. Bigger sensors also handle low lighting scenarios better. Even when the amount of light coming into the camera doesn’t change, a larger surface area allows the camera to collect more light. Larger sensors also make it easier to get soft, out-of-focus backgrounds.
When it comes to DSLRs, there’s two options for sensor sizes. APS-C is the smaller type, and the option that’s typically best for entry-level photographers. An APS-C sensor is usually plenty for new photographers to work with, and they’re often found on cameras that are easy to use and much more affordable.
A full frame or 35mm sensor is a bit larger—these cameras are usually considered professional DSLRs. They offer more resolution, but also a much higher price tag. If your camera budget exceeds $1,500, they could be an option, but a full frame camera is likely overkill for most beginners. So why mention it at all? Most lenses are sold for either full frame or APS-C sensors, so this is another scenario where changing later on may require updating your lenses too.
While sensor size is important, sensor design is too. Backlit sensors are designed with most of the gear and the circuitry at the back, so it’s easier for the light to reach the sensor. Sensors that are backlit perform better in low lighting than sensors that are not.
Many manufacturers are now also eliminating what’s called the optical low pass filter or sometimes the anti-aliasing filter. This filter helps prevent distortion in patterns called moire—the most common example is a shirt with fine stripes that start to bend and whirl together when photographed. Sensor technology is allowing some of this distortion elimination to be done without the use of that filter. Why is that important? The filter is one more thing between the sensor and the light. Cameras without the optical low pass filter tend to have more detail and richer colors. Many camera manufacturers are doing away with the filter entirely, like in most of Nikon’s newer DSLRs. Canon’s approach has been to make two different models of the same camera, one with the filter, and one without. That enhanced detail is a big help, though if you would like to do a lot of fashion photography or product photography for a clothing boutique, that extra moire prevention may be the better option.
Megapixels: Are they really important for an entry level DSLR?
Too many people buy cameras on megapixels alone—and that’s a horrible way to decide on a new camera. But, that doesn’t mean that they’re not important. Megapixels determine how much resolution your camera has. The number of pixels along one side multiplied by the number of pixels on the other side gets you a megapixel count. Cameras with more megapixels produce higher resolution images, so you can print bigger photos or crop without ruining the photo.
Megapixels are not as important as sensor size in determining image quality. That 42 megapixel smartphone still isn’t going to beat out a DSLR, even if the DSLR only has 16 megapixels. But, since we’re looking at DSLRs for beginners, let’s assume all the sensors are APS-C size. Then, the camera with more megapixels will have the higher resolution. Keep in mind that a higher resolution doesn’t necessarily mean better images. Cameras with high megapixel counts are more prone to noise at high ISOs, although many modern cameras have high megapixels with excellent noise reduction.
One more thing to consider—more megapixels means bigger image files. That’s certainly not a deal breaker, after all bigger files are more flexible in post processing. But, keep in mind that you’ll want bigger SD cards for high megapixel cameras, and also a pretty large hard drive to store them on too.
Speed: How fast can you snap?
How fast can you take a photo? Choosing a camera with good speed is essential for sports photographers, but speed is good for any photographer to have. If you’re a parent taking pictures of your kids, speed is essential for capturing the action. If you’re a budding portrait photographer, speed will help you capture the best expressions.
A camera’s speed is a bit harder to measure on paper, however. A good indication of a camera’s overall speed is the burst speed, or the number of photos it can take per second (or fps) if you continue to hold the shutter release.
There’s a lot of gear that has to be moved every time a DSLR takes a picture—like the mirror mechanism that mirrorless cameras don’t have, for example. And there’s also those big images to consider—it takes some time for a camera to process digital images, especially ones with a higher megapixel count. Because of all this, most DSLRs have burst speeds around 5 fps—they can take five images in one second. A 10 fps burst speed is an excellent speed for a DSLR.
The more photos a camera can take in one second, the more likely you are to capture the shot at the perfect moment. But, burst speed is also a good indicator of how fast the camera operates in general.
How much speed do you need? DSLRs with 10 fps burst speeds are excellent for capturing sports, as well as anything that moves quickly, like wildlife or little kids. A faster burst speed will increase your chances of capturing the perfect moment, but you can certainly still shoot little league games and other sports with 5 fps if there’s not enough room in the budget for a faster camera.
One more speed to consider—the maximum shutter speed. The shutter speed determines how long the camera’s shutter stays open to capture the picture. Budget DSLRs typically have a 1/4000 shutter speed—that’s plenty fast enough to freeze action and works for most types of photography. More advanced models will hit speeds of 1/8000 or even 1/16,000. Keep in mind though, that a shutter speed that fast requires a lot of light. Those top shutter speeds come in handy when shooting outside on a bright day with a wide aperture without overexposing the shot.
Prices for an entry level DSLR camera
Buying a camera isn’t about finding the best one on the market—it’s about finding the best one for your style and your budget. There are several DSLRs on the market that cost the same as a small car and are packed full of the top features, but there are also several for just a few hundred dollars that do a pretty good job and have a feature set that’s ideal for beginners.
Entry-level DSLRs are available for as little as $300 for an older model, though $500-$1,000 is a bit more realistic. The price heads up from there as you add features, like faster speeds and more megapixels.
You can also save a bit by buying a DSLR that’s not the current model. Older DSLRs are still great cameras and sometimes you can pick up an older mid-level DSLR for the same price as a newer entry-level DSLR and get more features. Be careful though to compare features carefully, newer cameras often get a boost in image quality as technology improves. There’s usually not much difference in models that are a year old, but more than two years old and there’s often a noticeable difference in image quality.
Kit lens or body-only?
Once you decide on a DSLR, you have one more choice to make—buy the kit, or body only? Most beginners buy a DSLR with a kit lens. Kit lenses are great because they often cover a the most common zoom range, usually 18mm to 55mm. They’re inexpensive and a good way to get started in photography.
Kit lenses are often a bit limited, however. Most kit lenses have a maximum aperture of around f/3.6. Aperture determines how wide the opening in the lens is. A wider aperture, like f/1.8 is better for taking photos in limited light or getting a softer, out-of-focus background. Upgrading to a f/1.8 or f/2.8 lens often makes a big difference in image quality, however, it is significantly more expensive than opting for the kit lens.
Choosing the Best DSLR Cameras For Beginners: 2016 Recommendations
Choosing a DSLR for beginners is about picking a camera that suits your style. If you take pictures of sports or other action, for example, you’ll want to place a higher priority on speed. If you photograph landscapes or other still scenes, resolution from the sensor size and megapixel count is more important. Before you choose a DSLR camera, you should understand sensor size, megapixels, speed and price. If you’re nervous about learning photography, look at pictures of the camera and choose a model with fewer buttons and dials so using the camera doesn’t seem so overwhelming. Understanding these features to choose the camera that’s right for you is important, but here are some of the best DSLR cameras for beginners on the market right now:
The Nikon D3300 is great for getting into photography without a huge price tag. It’s the cheapest camera Nikon makes, but is a good starter point since it’s simple to use.
-Sensor: APS-C, no optical low pass filter
-Megapixels: 24.2
-Speed: 5 fps, 1/4000 maximum shutter speed
-Price: $446 with 18-55mm kit lens
Want to learn how to use this camera? Good news, we have a fantastic Fast Start course for this specific camera model.
DSLRs from smaller manufacturers shouldn’t be overlooked. The Pentax K-S2 has an excellent price, along with features that are hard to find on entry-level models, like weather-sealing and wi-fi.
The Nikon D5500 is the D5300’s big brother, with a tilting LCD screen, wi-fi and a better autofocus system, but similar specs where it really counts in image quality and speed.
-Sensor: APS-C, no optical low pass filter
-Megapixels: 24.2
-Speed: 5 fps, 1/4000 maximum shutter speed
-Price: $746 body-only, $846 with 18-55mm kit lens
Want to learn how to use this camera? Good news, we have a fantastic Fast Start course for this specific camera model.
Canon’s EOS 7D Mark II is the fastest APS-C DSLR camera currently on the market with a 10 fps burst speed. It’s pricer than most entry-level models, but that speed may be well worth the extra expense for sports and other action.
-Sensor: APS-C, with optical low pass filter
-Megapixels: 20.2
-Speed: 10 fps, 1/8000 maximum shutter speed
-Price: $1,499 body-only, $1,459 with 18-135mm kit lens
Want to learn how to use this camera? Good news, we have a fantastic Fast Start course for this specific camera model.
Final Thoughts
There isn’t a one-size-fits-all best DSLR camera for beginners. But, there’s a handful of excellent options on the market that are well-suited for inexperienced photographers, some faster or with more features. And by learning how to choose a camera, you’ll have a good start to learning just how to use that camera with this popular photography for beginners course.
Get the most out of your new camera with John Greengo’s Fundamentals of Digital Photography course, which will teach you everything you need to know about gear, tools, and how to tell a compelling story through your images.
Get the latest news
Connecting you with the tips and inspirationyou need to create great work.
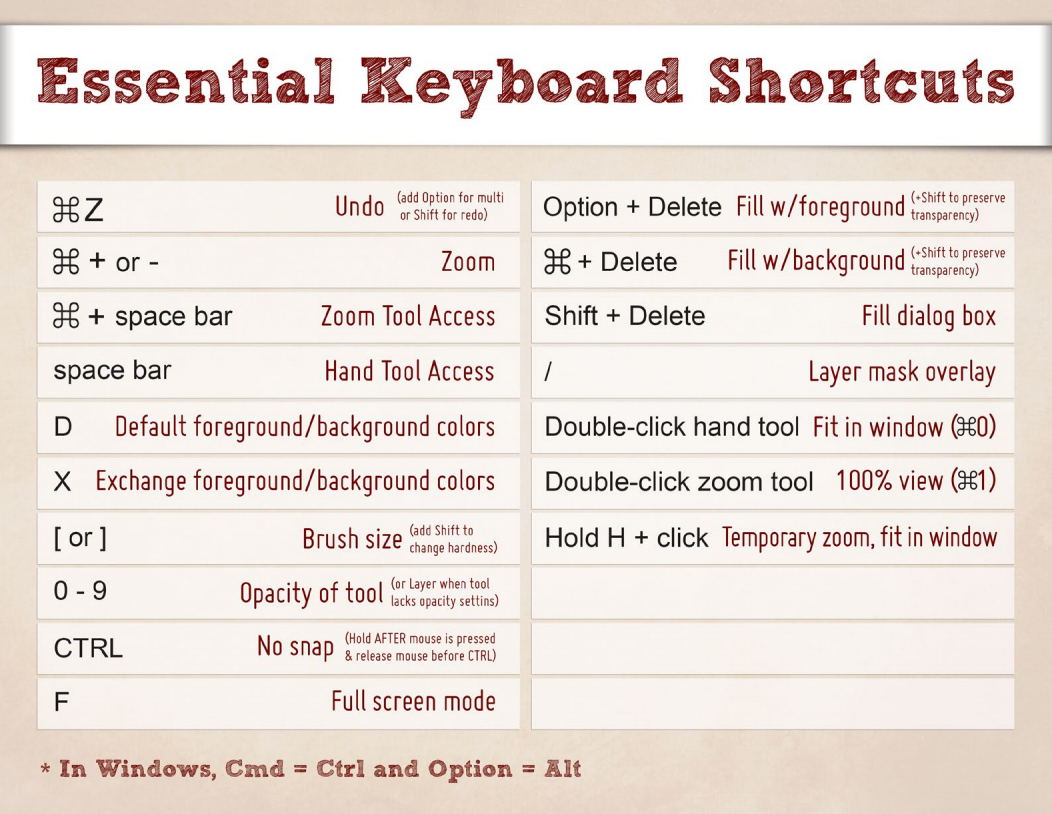
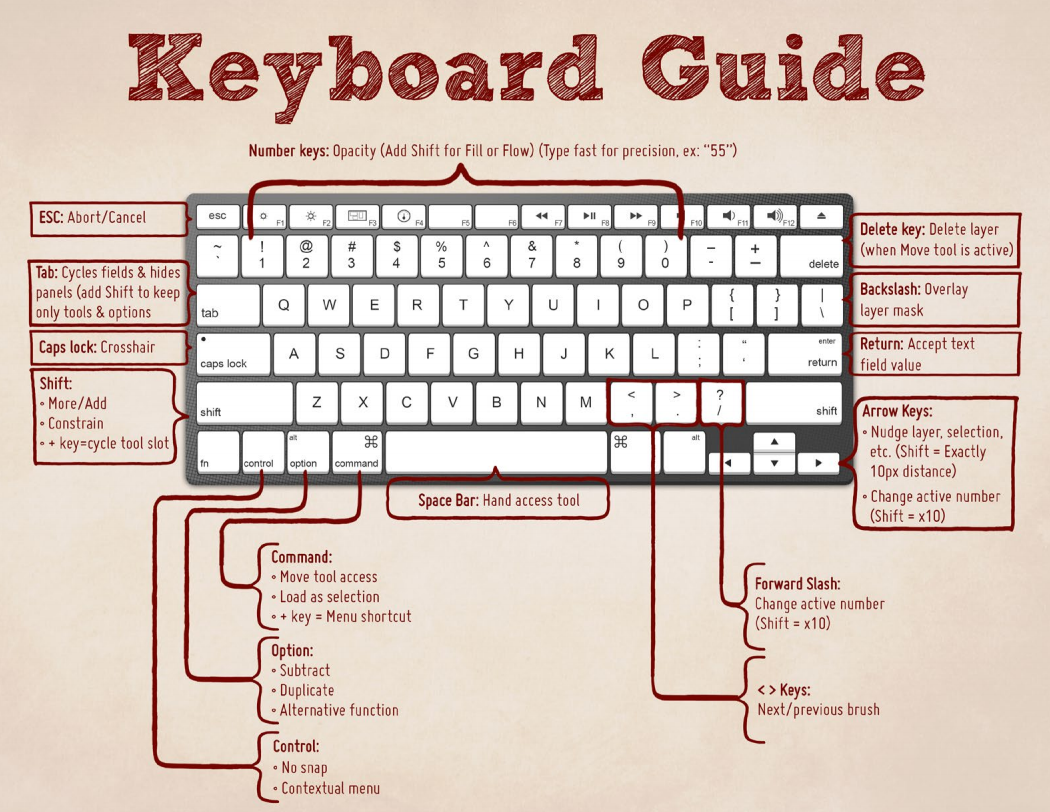
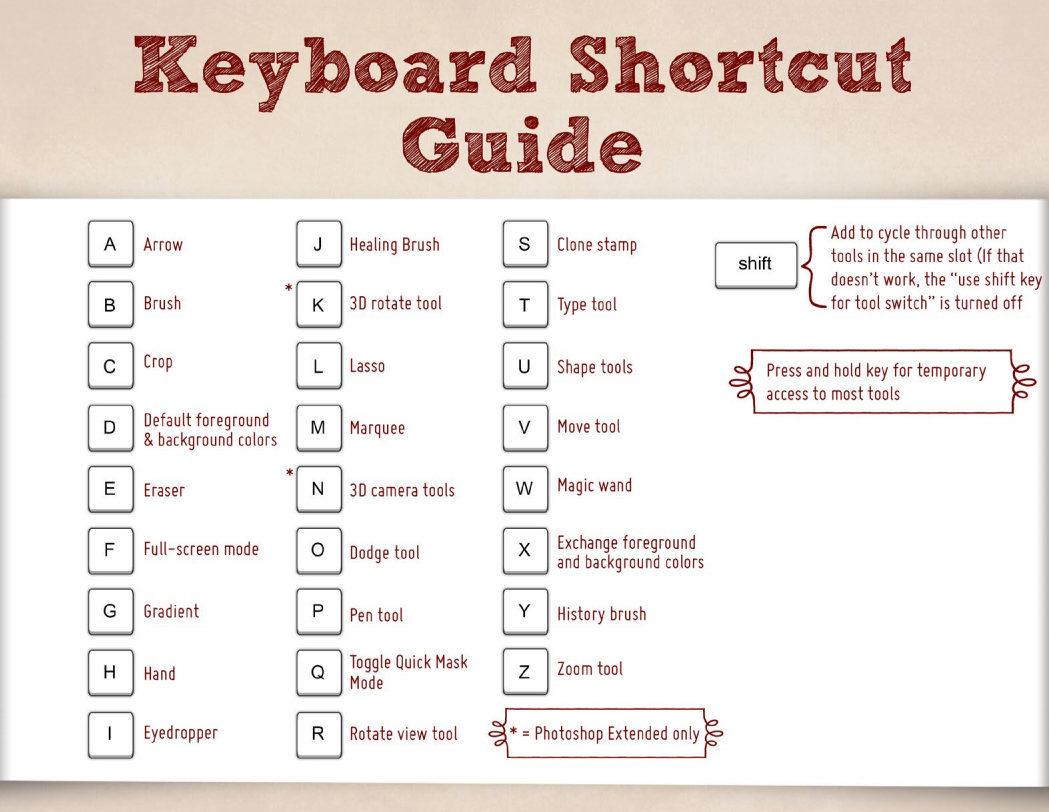
Your Photoshop workflow depends on several factors, including the volume of work you’re dealing with and your own mastery of the software. Lightroom and Photoshop instructor Ben Willmore has another secret for helping speed up your workflow when editing photos: Photoshop keyboard shortcuts.
Becoming familiar (and quick) with these shortcuts can help you make changes without requiring a lot of physical movement, which can take valuable time out of your editing. Zooming, undoing changes, and even nudging layers can all be done with your hands on the keys — so long as you know where the keyboard shortcuts are.
Below are Ben’s recommended Photoshop keyboard shortcut guides.